
Intro:
This guide will help you to understand KVM and its installation on Virtualizor.
What is KVM?
KVM stands for Kernel-based Virtual Machine, and it is an open-source virtualization technology for the Linux operating system. It allows you to turn a Linux kernel into a hypervisor, which enables you to run multiple virtual machines (VMs) or guests on a single physical host machine. Each VM acts as an independent computer with its own virtualized hardware, including CPU, memory, disk, and network interfaces.
KVM leverages hardware virtualization extensions provided by modern CPUs, such as Intel VT-x or AMD-V, to improve performance and isolate the guest operating systems. By using these extensions, the hypervisor can directly interact with the host hardware and efficiently manage the VMs.
KVM is often used in combination with other software components, such as QEMU (Quick Emulator), which provides device emulation and helps manage the VMs. The combination of KVM and QEMU allows users to run a wide range of operating systems, including Linux, Windows, BSD, and others, on the same physical best cheap web hosting in USA host.
Overall, KVM is a popular and powerful virtualization solution for Linux, providing a cost-effective way to consolidate hardware resources and run multiple VMs on a single machine while maintaining good performance and isolation between the guests.
Read: Problems When You Log Out of An Account In cPanel
What is Virtualizor?
It is a popular virtualization platform that helps you to design and manage VPS with different kinds of virtualization with the help of a GUI.
Go through the steps of installing KVM on Virtualizor:
Requirements
- CentOS 7.x / 8.x (Beta) or Red Hat Enterprise Linux 7 or
Ubuntu 14.04 / 16.04 / 18.04 / 20.04 / 22.04 or AlmaLinux 8.x / 9.x
- Yum / apt-get
- Storage to create the VPS disks
Read: Reasons for Website Down – Explained}
Partition Scheme
Develop the following partitions on the hardware node:

Supported Storage Types
(LVM | File | Thin LVM | ZFS | ZFS Thin | ZFS Compressed | ZFS Thin Compressed | Ceph Block Device)
Installation
Open a Shell Terminal (e.g. PuTTY) and SSH to your server. Run the following commands:

Check below the installation parameters:
- Give email address correctly
- Kernel for KVM
- Noos – to avoid downloading of the OS template for the VPS then add noos=true as a parameter.
- Beta: For testing the new version of Virtualizor you need to add beta=true as a parameter.
- Nested virt: If you want to enable Nested Virtualization on your server then please add nested virt=1 as a parameter. You can install a new kernel to enable nested virtualization.
- License – You need a valid license key for installing Virtualizor on the internal network. To get the internal license key you need to open a support ticket.
Check: All About WHMCS Is Explained
Soon,
The installation will start and if installation is stopped then your network speed must be slow, but it’s suggested to continue the installation process. You will get a screen like this:
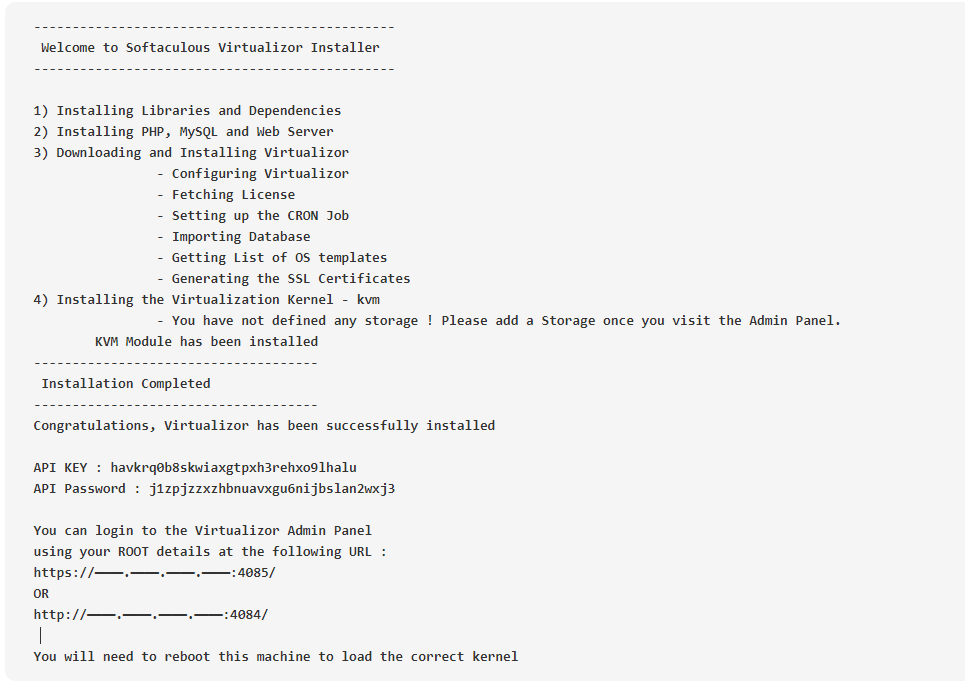
Once installation is over you’ve to reboot the system.

Note:
You need to visit the Admin Panel to create the storage and the virtual servers and also manage the server. A log file of the installation process is created – /root/virtualizor.log
Login
You’ve to visit the following URL for login purposes to Softaculous Virtualizor Admin Panel.
https://Your-Server-IP:4085/
http://Your-Server-IP:4084/
Log in with the server’s root details.